Enterprise Structure Configuration Settings
Enterprise Structure :- The SAP Financial Accounting enterprise structure is organisational structure that represent an enterprise structure in SAP and Enterprise Structure is the key building block to the entire organisation.
Below are the Steps of Enterprise Structure Settings and configuration
- Define Company
- Define Company Code
- Assign Company Code to Company
- Define Business Area
- Define Functional Area
- Define Credit Control Area
- Assign Company Code to Credit Control Area
SAP Menu Path :- SPRO –> IMG –> Enterprise Structure –> Definition –> Financial Accounting –> Define Company
Transaction Code :- OX15
SAP Menu Path :- SPRO –> IMG –> Enterprise Structure –> Definition –> Financial Accounting –> Edit, Copy, Delete, Check Company Code
Sap Menu Path :- SPRO –> IMG –> Enterprise Structure –> Assignment –> Financial Accounting –> Assign Company Code to Company
Transaction Code :- OX16
SAP Menu Path :- SPRO –> IMG –> Enterprise Structure –> Definition –> Financial Accounting –> Define Business Area
Transaction Code :- OX03
SAP Menu Path :- SPRO –> IMG –> Enterprise Structure –> Definition –> Financial Accounting –> Define Functional Area
SAP Menu Path :- SPRO –> IMG –> Enterprise Structure –> Definition –> Financial Accounting –> Define Credit Control Area
Transaction Code :- OB45
Sap Menu Path :- SPRO –> IMG –> Enterprise Structure –> Assignment –> Financial Accounting –> Assign Company Code to Credit Control Area
Financial Accounting Global Settings Configuration Steps
Step 1 :- Define Fiscal year
Step 2 :- Assign Company Code to Fiscal Year variant
Step 3 :- Define variant for opening Posting period
Step 4 :- Define Variant for open and close posting period
Step 5 :- Assign Variant to Company code
Step 6 :- Define Field status variant
Step 7 :- Assign Company code to Field Status Variants
Step 8 :- Define Posting Keys
Step 9 :- Define Document types
Step 10 :- Define Document Number Range
Step 11 :- Define Tolerance group for Users
Step 1 :- Define Fiscal year
SAP Path :- SPRO –> IMG –> Financial Accounting –> Financial Accounting Global Settings –> Fiscal Year –> Maintain Fiscal year variant
Transaction Code :- OB29
Step 2 :- Assign Company Code to Fiscal Year variant
SAP Path :- SPRO –> IMG –> Financial Accounting –> Financial Accounting Global Settings –> Fiscal Year –> Assign Company Code to Fiscal Year variant
Transaction Code :- OB37
Step 3 :- Define variants for opening Posting period
SAP Path :- SPRO –> IMG –> Financial Accounting –> Financial Accounting Global Settings –> Documents –> Posting Period –> Define variants for opening Posting period
Transaction Code :- OBBO
Step 4 :- Define Variant for open and close posting periods
SAP Path :- SPRO –> IMG –> Financial Accounting –> Financial Accounting Global Settings –> Documents –> Posting Period –> open and close posting periods
Transaction Code :- OB52
Step 5 :- Assign Variants to Company code
SAP Path :- SPRO –> IMG –> Financial Accounting –> Financial Accounting Global Settings –> Documents –> Posting Period –> Assign Variants to Company code
Transaction Code :- OBBP
Step 6 :- Define Field status variants
SAP Path :- SPRO –> IMG –> Financial Accounting –> Financial Accounting Global Settings –> Documents –> Line Item –> Controls –> Define Field status variants
Transaction Code :- OBC4
Step 7 :- Assign Company code to Field Status Variants
SAP Path :- SPRO –> IMG –> Financial Accounting –> Financial Accounting Global Settings –> Documents –> Line Item –> Controls –> Assign Company code to Field Status Variants
Transaction Code :- OBC5
Step 8 :- Define Posting Keys
SAP Path :- SPRO –> IMG –> Financial Accounting –> Financial Accounting Global Settings –> Documents –> Line Item –> Controls –> Define Posting Keys
Transaction Code :- OB41
Step 9 :- Define Document types
SAP Path :- SPRO –> IMG –> Financial Accounting –> Financial Accounting Global Settings –> Documents –> Document Header –> Define Document types
Transaction Code :- OBA7
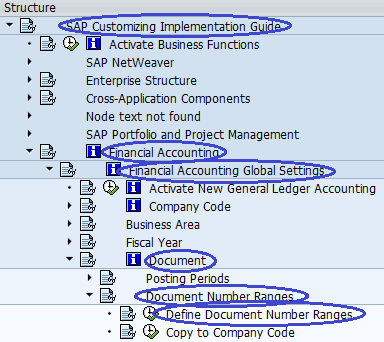
Step 10 :- Define Document Number Range
SAP Path :- SPRO –> IMG –> Financial Accounting –> Financial Accounting Global Settings –> Documents –> Document Header –>Document Number Range –> Define Document Number Range
Transaction Code :- OBA7
Step 11 :- Define Tolerance group for Users
SAP Path :- SPRO –> IMG –> Financial Accounting –> Financial Accounting Global Settings –> Documents –> Line Item –> Controls –> Define Tolerance group for Users
Transaction Code :- OBA4
General Ledger Accounting Configuration Steps
General Ledger Accounting :- The General ledger accounting is the complete record of all business transactions.
GL Accounting Configuration Steps :-
- Step-1 :- Define Chart of Accounts
- Step-2 :-Assign Company Code to Chart of Accounts
- Step 3 :- Define Account Groups
- Step 4 :- Define Retained Earning Account
- Step 5 :- Creation of GL Master Records
- Step 6 :- Define Tolerance Group for GL Account
Step 1 :- Define Chart of Accounts
SAP Path :- SPRO -> IMG –> Financial accounting –> General ledger Accounting –> GL Accounts –> Master Data–> Preparations –> Edit Chart of Accounts list
Transaction Code :- OB13
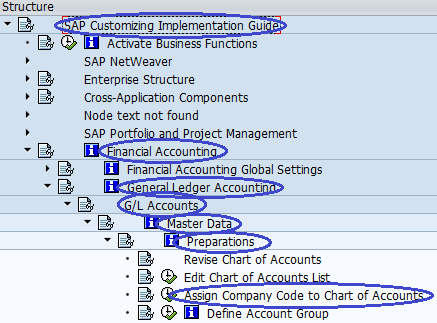
Step-2 :-Assign Company Code to Chart of Accounts
SPRO -> IMG –> Financial accounting –> General ledger Accounting –> GL Accounts –> Master Data–> Preparations –> Assign Company Code to Chart of Accounts
Transaction Code :- OB62
Step 3 :- Define Account Groups
SAP Path :- SPRO -> IMG –> Financial accounting –> General ledger Accounting –> GL Accounts –> Master Data–> Preparations –> Define Account Groups
Transaction Code :- OBD4
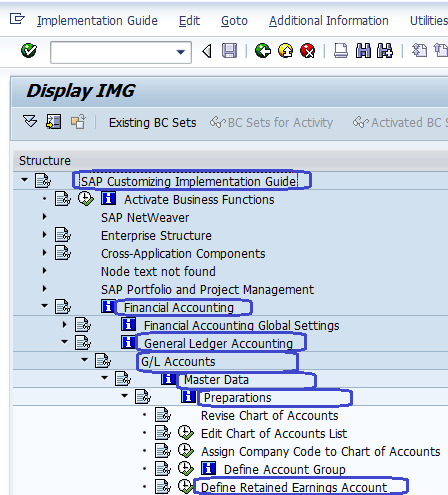
Step 4 :- Define Retained Earnings Account
SAP Path :- SPRO -> IMG –> Financial accounting –> General ledger Accounting –> GL Accounts –> Master Data–> Preparations –> Define Retained Earnings Account
Transaction Code :- OB53
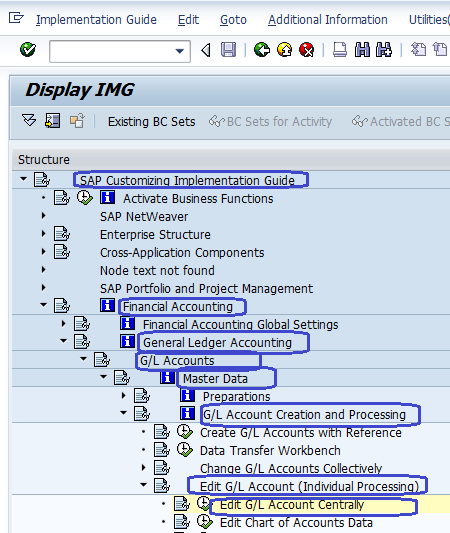
Step 5 :- Creation of GL Master Records
SAP Path :- SPRO -> IMG –> Financial accounting –> General ledger Accounting –> GL Accounts –> Master Data–> Preparations –> GL Account Creation and Processing –> Edit G/L Account
Transaction Code :- FS00
Step 6 :- Define Tolerance Group for GL Account
SAP Path :- SPRO -> IMG –> Financial accounting –> General ledger Accounting –> Business transactions –> Open Item Clearing –> Clearing Differences –> Define Tolerance Groups for GL Accounts
Transaction Code :- OBA0
Accounts Payable Configuration Steps :-
Accounts Payable Overview :- Accounts Payable is a Subsidiary Ledger account. Accounts payable records and manages accounting data for all vendors. When postings are made in Accounts Payable simultaneously recorded in the General ledger account.
Steps in Accounts Payable Configuration are as follows
- Step 1 :- Creation of Vendor Account Groups
- Step 2 :- Create number range for vendors account
- Step 3 :- Assign number range to vendor account groups
- Step 4 :- Define tolerance group for vendor
- Step 5 :- Creation of vendor master
- Step 6 :- Creation of GL as Reconciliation Accounts
- Step 7 :- Document types and no. ranges
- Step 8 :- Vendor Payment Terms
- Step 9 :- Automatic Payment Program
Step 1 :- Creation of Vendor Account Groups
SAP Path :SPRO –> Financial accounting –> Accounts Receivable and Accounts Payable –> Vendor Accounts –>Master data –> preparation for creating vendor master data –> Define Account Groups with Screen Layout (Vendors)
Transaction Code :- OBD3
Step 2 :- Create number ranges for vendors account
SAP Path :- SPRO –> Financial accounting –> Accounts Receivable and Accounts Payable –> Vendor Accounts –> Master data –> Preparation for creating vendor master data –> Create number ranges for vendors account
Transaction Code :- XKN1

Step 3 :- Assign Number Range to Vendor Account Groups
SAP Path :SPRO –> Financial accounting –> Accounts receivable and accounts payable –> Vendor Accounts –>Master data –> preparation for creating vendor master data –> Assign Number Range to Vendor Account Groups
Transaction Code :- OBAS
Step 4 :- Define tolerance group for vendors
SAP Path :SPRO –> Financial accounting –> Accounts receivable and accounts payable –> Business transactions –> Outgoing payments –> Manual outgoing payments –> Define Tolerances (Vendors)
Transaction Code :- OBA3
Step 5 :- Creation of Vendor Master
SAP Path :- SAP Menu –> Accounting –> Financial Accounting –> Account payable –> Master Records –> Maintain Centrally –> Create
Transaction Code :- XK01
Step 6 :- Creation of GL as Reconciliation Accounts ( Sundry Creditors )
SAP Menu Path:- SAP Menu –> Accounting –> Financial Accounting –> General Ledger –> Master Records –> Individual Processing –> Create Centrally
Transaction Code :- FS00
Step 7 :-Document types and no. Ranges ( KZ, KR, KA )
SAP Menu Path :- SPRO –> IMG –>Financial Accounting –>Financial Accounting Global Setting –>Document–>Document Number ranges –> Define Document Number Ranges
Transaction Code :- FBN1
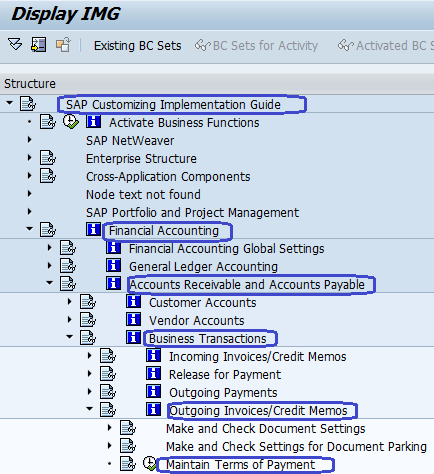
Step 8 :- Vendor Payment Terms
SAP Menu Path:- IMG –> Financial Accounting –> Accounts Receivable & Accounts Payable –> Business Transactions –> Outgoing Invoices/Credit Memos –> Maintain Terms of Payment
Transaction Code :- OBB8
Step 9 :- Automatic Payment Program
Menu Path:- IMG –> Financial Accounting –> Accounts Receivable & Payable –> Business Transactions –> OutgoingPayments –> Automatic Outgoing Payments –> Payment method/Bank Selection for Payment program
Transaction Code :- FBZP
Accounts Receivable
SAP FICO Accounts Receivable Configuration Steps
- Step 1 :- Creation of Customer Account Group
- Step 2 :- Create Number Ranges for for Customer Accounts
- Step 3 :- Assign Number range to Customer Accounts groups
- Step 4 :- Define tolerance group for Customer
- Step 5 :- Creation of GL Reconciliation Accounts ( Sundry Debtors )
- Step 6 :- Creation of Customer master records
- Step 7 :- Document types and Number range ( DR, DZ, DA )
- Step 8 :- Bill of Exchange
- Step 9 :- Dunning
Step 1 :- Creation of Customer Account Group :-
SAP Path :- SPRO –> Financial Accounting –> Accounts Receivable and Accounts Payable –> Customer Accounts –> Master Data –> Preparation for creating customer master data –> Define Account Groups with Screen layout ( Customer )
Transaction Code :- OBD2
Step 2 :- Create Number Ranges for Customer Accounts
SAP Path :- SPRO –> Financial Accounting –> Accounts Receivable and Accounts Payable –> Customer Accounts –> Master Data –> Preparation for creating customer master data –> Create Number Ranges for Customer Accounts
Transaction Code : XDN1
Step 3 :- Assign Number range to Customer Accounts groups :-
SAP Path :- SPRO –> Financial Accounting –> Accounts Receivable and Accounts Payable –> Customer Accounts –> Master Data –> Preparation for creating customer master data –> Assign Number ranges to Customer Accounts groups
T Code :- SPRO
Step 4 :- Define tolerance group for Customer :-
SAP Path :- SPRO –> Financial Accounting –> Accounts Receivable and Accounts Payable –> Business Transactions –> Incoming payments –> Manual incoming payments –> Define Tolerance ( Customer )
T Code :- OBA3
Step 5 :- Creation of GL Reconciliation Accounts ( Sundry Debtors )
SAP Menu Path:- SAP Menu –> Accounting –> Financial Accounting –> General Ledger –> Master Records –> Individual Processing –> Create Centrally
Transaction Code :- FS00
Step 6 :- Creation of Customer master records
SAP Menu Path :- SAP Menu –> Accounting –> Financial Accounting –> Accounts Receivable –> Master Records –> Create
T Code :- XD01
Step 7 :- Document types and Number range ( DR, DZ, DA )
SAP Menu Path :- SPRO –> IMG –>Financial Accounting –>Financial Accounting Global Setting –>Document–>Document Number ranges –> Define Document Number Ranges
Transaction Code :- FBN1
Step 8 :- Bill of Exchange :-
SAP Menu Path :- SPRO –> IMG –> Financial Accounting –> Bank Accounting –> Business Transactions –> Bills of Exchange Transactions –> Bills of exchange receivable –> Define Alternative recon a/c for bills of exchange
Transaction Code :- OBYN
Step 9 :- Dunning :-
SAP Path :- SPRO –> Financial Accounting –> Accounts Receivable and Accounts Payable –> Business Transactions –>Dunning –> Basic Settings for Dunning –> Define Dunning Area
Transaction Code :- OB61
Asset Accounting
Asset Accounting Overview:- Asset Accounting is an important module in SAP and manages assets of an organisation by master records. Asset accounting is a sub ledger to the SAP FI module for managing the Asset records.
SAP Asset Accounting Configuration Steps :-
- Step 1 :- Copy Reference Chart of Depreciation/ Depreciation Area
- Step 2 :- Assign Chart of Depreciation to Company Code
- Step 3 :- Specify Account Determination
- Step 4 :- Create screen Layout Rule
- Step 5 :- Define Number range Interval
- Step 6 :- Define Asset Classes
- Step 7 :- Determine Depreciation area in the Asset Class
- Step 8 :- Assignment of General Ledger Accounts
- Step 9 :- Specify Intervals and Posting Rules
- Step 10 :- Define Screen Layout for Asset master data
- Step 11 :- Define Screen Layout for Asset Depreciation Areas
- Step 12 :- Define Depreciation Methods
- Step 13 :- Maintain Depreciation keys
- Step 14 :- Depreciation Run
- Step 15 :- Create Asset Master
Step 1 :- Copy Reference Chart of Depreciation/ Depreciation Area
SAP Menu Path :- SPRO –> Financial Accounting –> Asset Accounting –> Organisational Structure –> Copy Reference Chart of Depreciation/ Depreciation Area
T code :- EC08
Step 2 :- Assign Chart of Depreciation to Company Code
SAP Menu Path :- SPRO –> Financial Accounting –> Asset Accounting –> Organisational Structure –>Assign Chart of Depreciation to Company Code
T Code :- OAOB
Step 3 :- Specify Account Determination
SAP Menu Path :- SPRO –> Financial Accounting –> Asset Accounting –> Organisational Structure –> Asset Classes –> Specify Account Determination
Step 4 :- Create screen Layout Rule
SAP Menu Path :- SPRO –> Financial Accounting –> Asset Accounting –> Organisational Structure –> Asset Classes –> Create screen Layout Rule
Step 5 :- Define Number range Interval
SAP Menu Path :- SPRO –> Financial Accounting –> Asset Accounting –> Organisational Structure –> Asset Classes –> Define Number range Interval
T Code :- AS08
Step 6 :- Define Asset Classes
SAP Menu Path :- SPRO –> Financial Accounting –> Asset Accounting –> Organisational Structure –> Asset Classes –> Define Asset Classes
T Code :- OAOA
Step 7 :- Determine Depreciation area in the Asset Class
SAP Menu Path :- SPRO –>IMG –> Financial Accounting –> Asset Accounting –> Valuation –> Determine Depreciation area in the Asset Class
T Code :- OAYZ
Step 8 :- Assignment of General Ledger Accounts
SAP Menu Path :- SPRO –>IMG –> Financial Accounting –> Asset Accounting –> Integration with General Ledger –> Assign General Ledger Accounts
T Code :- AO90
Step 9 :- Specify Intervals and Posting Rules
SAP Menu Path :- SPRO –>IMG –> Financial Accounting –> Asset Accounting –> Integration with General Ledger –> Post Depreciation to General Ledger –> Specify Intervals and Posting Rules
T Code :- OAYR
Step 10 :- Define Screen Layout for Asset Master data
SAP Menu Path :- SPRO –>IMG –> Financial Accounting –> Asset Accounting –> Master Data –> Screen Layout –> Define Screen Layout for Asset Master data
Step 11 :- Define Screen Layout for Asset Depreciation Areas
SAP Menu Path :- SPRO –>IMG –> Financial Accounting –> Asset Accounting –> Master Data –> Screen Layout –> Define Screen Layout for Depreciation Areas
T Code :- AO21
Step 12 :- Define Depreciation Methods
- Define Base methods
- Define Decline Balance Methods
- Define Multi Level methods
SAP Menu Path :- SPRO –>IMG –> Financial Accounting –> Asset Accounting –>Depreciation –> Valuation methods –>Depreciation Key –> Calculation methods –> Define Base methods
SAP Menu Path :- SPRO –>IMG –> Financial Accounting –> Asset Accounting –>Depreciation –> Valuation methods –>Depreciation Key –> Calculation methods –> Define Decline Balance Methods
SAP Menu Path :- SPRO –>IMG –> Financial Accounting –> Asset Accounting –>Depreciation –> Valuation methods –>Depreciation Key –> Calculation methods –> Define Multi Level methods
Step 13 :- Maintain Depreciation keys
SAP Menu Path :- SPRO –>IMG –> Financial Accounting –> Asset Accounting –>Depreciation –> Valuation methods –>Depreciation Key –> Maintain Depreciation Key
T Code :- AFAMA
Step 14 :- Depreciation Run :-
SAP Menu Path :- SPRO –>IMG –> Financial Accounting –> Fixed Assets –> Periodic Processing –> Depreciation Run –> Execute
T Code :- AFAB
Step 15 :- Create Asset Master
SAP Menu Path :- SAP Menu –> Accounting –> Financial Accounting –> Fixed Assets –> Asset –> Create
T Code :- AS01
Bank Accounting
Bank Accounting :- Bank account is an important module in SAP fi which is used to handle accounting transactions that you process with your bank. Bank Accounting includes the management of organisation Bank Master data and processing of incoming and outgoing payments.
Bank Accounting Configuration Steps :-
Step 1 :- Define House Banks
Step 2 :- Create Bank Key
Step 3 :- Electronic Bank Statement Configuration
- Creation of Accounts Symbols
- Assign Accounts to Accounts symbols
- Create Keys for Posting Rules
- Define Posting Rules
- Create Transaction Type
- Assign External Transaction Types to Posting Rules
- Assign Bank Accounts to Transaction Types
Step 4 :- Manual Bank Statement
Step 5 :- Define Posting Keys and Posting Rules for Check Deposit
Step 6 :- Create and Assign Business Transactions
Step 7 :- Define Variants for Check Deposit
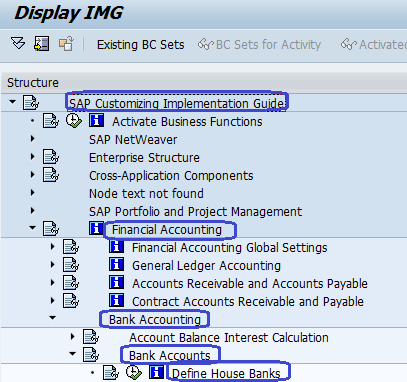
Step 1 :- Define House Banks
Menu Path :- SPRO –> IMG –> Financial Accounting –> Bank Accounting –> Bank Accounts –> Define house banks
Transaction Code :- FI12
Step 2 :- Create Bank Key
SAP Menu Path :- SAP Menu –> Accounting –> Financial Accounting –> Accounts Receivable –> Master Records –> Bank –> Create ( Create bank Key )
Transaction Code :- FI01
Step 3 :- Electronic Bank Statement Configuration
Sap Menu Path :- SPRO –> IMG –> Financial Accounting –> Bank Accounting –> Business Transactions –> Payment Transactions –> Electronic Bank Statement –> Make Global Settings for Electronic Bank Statement
- Creation of Accounts Symbols
- Assign Accounts to Accounts symbols
- Create Keys for Posting Rules
- Define Posting Rules
- Create Transaction Type
- Assign External Transaction Types to Posting Rules
- Assign Bank Accounts to Transaction Types

Step 4 :- Manual Bank Statement :-
Sap Menu Path :- SPRO –> IMG –> Financial Accounting –> Bank Accounting –> Business Transactions –> Payment Transactions –> Manual Bank Statement –> Create and Assign Business transactions
Step 5 :- Define Posting Keys and Posting Rules for Check Deposit
Sap Menu Path :- SPRO –> IMG –> Financial Accounting –> Bank Accounting –> Business Transactions –> Check Deposit –> Define Posting Keys and Posting Rules for Check Deposit
Step 6 :- Create and Assign Business Transactions
Sap Menu Path :- SPRO –> IMG –> Financial Accounting –> Bank Accounting –> Business Transactions –> Check Deposit –> Create and Assign Business Transactions
Step 7 :- Define Variants for Check Deposit
Sap Menu Path :- SPRO –> IMG –> Financial Accounting –> Bank Accounting –> Business Transactions –> Check Deposit –> Define Variants for Check Deposit